Storyboard templates are visual tools filmmakers use to plan out each shot of a scene or sequence. It often incorporates sketches or images that represent what’s in a single frame and includes notes about the characters, actions, dialogue, and settings to further describe what’s going on at each moment.
You can use a storyboard to map out an entire film or season of TV, outline a single act or sequence, or even break down an individual scene into its important moments and beats. You can also use one for nearly any visual storytelling project, including shorts, features, commercials, sitcoms, serials…you name it.
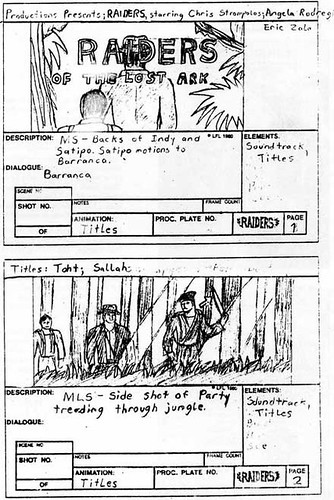
Image via Flickr by TrueFalseFilmFestival
Many different visual storytellers use storyboards in their creative processes. Animators frequently use storyboards to draw characters in action, but writers, directors, cinematographers, editors, storyboard artists, and other production professionals rely on storyboards to:
- Organize plot points
- Chart character development
- Scout locations
- Block scenes for actors
- Compose frames and shots
- Choose props and lighting techniques
- Select costume, hair, and makeup
- Edit filmed content into a coherent, engaging story
- Match sound effects and dialogue with visuals
- Create a strong, professional pitch
Even with so many different uses, there are two major types that you are likely to use in your filmmaking career. The storyboard for the shot is typically used during the pre-production and production/photography phases whereas the storyboard for the edit is a post-production tool for putting the visual and audio assets together. A storyboard template is the blank slate version of these tools where you can fill in all of the details and customize it to whichever of the two major purposes it serves. Here are some examples of storyboard templates you can download and use:
- https://boords.com/storyboard-template
- https://www.studiobinder.com/blog/downloads/storyboard-template/#pdf-storyboard-templates
- https://www.printablepaper.net/category/storyboard
- https://www.powerproduction.com/storyboard-templates.html
Here is a video on how to draw storyboards:
What Does a Storyboard Look Like?
The structure, layout, and orientation of a storyboard may vary. Some storyboards are vertically organized while others are landscape/horizontal. Some may have description spaces above, below, or on either side of the shot image box. No matter the style, all storyboards and templates have many of the same key elements to organize and plan a filmmaking project, including:
- Shot image: There’s often an empty box for you to sketch in or include a photo of what’s in the frame. You can showcase elements like the camera angle, props, set decoration, exterior setting elements and character expressions, actions, and costume.
- Sequence title: If your storyboard is made up of several pages of panels, at the top of each page, you can write the title of the sequence the panels represent. Use a title that describes the significance to a character or the major plot point the sequence covers to clearly outline the purpose of the series of shots.
- Scene and shot number: Many storyboard templates include a line or empty space near each shot image box for you to write the scene and shot number. For example, you’d write “5.6” to indicate that the panel represents scene 5, shot 6.
- Exterior/interior indication: Be sure to include whether the shot is exterior (EXT.) or interior (INT.) so that you and your collaborators can properly decide on a location. Include this information on the same line as the scene/shot number, above the shot image box, or in the shot explanation.
- Shot explanation: Typically, templates include a few lines or empty space for you to write more details about the frame. Common information in this space includes shot type and camera directions, dialogue, action lines, sound effects, and directing notes about characters. However, some storyboard templates may even include additional elements, such as animation direction, superimposed text, editing transitions, and frame count.
- Page number: For both physical and digital copies of your storyboard, number each page to help you keep the sequences in order.
Since there are many pre-made template options and even the choice to make your own storyboard template, you can find the structure, layout, and orientation that works best for your creative process.
Finding Pre-made Templates
There are many pre-made templates to help you get started, especially if you’ve never used a storyboard before. Using a pre-made template can ensure you have all of the elements you need, laid out in an easy-to-understand way.
A Google Image search for ‘storyboard template’ pulls up hundreds of options you can print out and fill in right away. If you’d rather use a digital template on your computer, tablet, or smartphone, there are many storyboard apps you can download for free, as a subscription, or for a one-time purchase. Free options include Storyboard Composer, Storyboarder, and Canva.
In addition, many scriptwriting software have built-in storyboarding features. FinalDraft 11 has the open-form Beat Board function that you can easily transform into a storyboard that connects directly to your script. Celtx also has the robust Storyboard and Shot Blocker features to easily transition your story from page to screen.
How to Create a Storyboard Template
If you don’t find a pre-made template that’s just right, you can create your own. Making your own template may be more time-consuming upfront, but it allows you to include space for each of the elements you need, especially ones that aren’t always included, in a way that best helps you. You can even use apps that you probably already have on your computer, like Microsoft Word, PowerPoint, and Adobe Illustrator.
Here’s how you create your own storyboard template using these apps:
- Select an orientation for the page, slide, or artboard. Vertical orientation can work for nearly any layout. Horizontal/landscape can be used for image-focused storyboards or even those that balance image and descriptive text.
- Draw two, four, six, or eight empty boxes aligned in one or two columns. The number of boxes and columns depends on how large you want the images and how much descriptive information you plan to write. If you want to include more descriptive elements or larger frames, consider limiting each page to two or four boxes. If you’re more focused on the shots moving the story forward, you can include more boxes per page.
- Add empty space or lines for description. Leaving empty space allows you to have a flexible area to write descriptions. You could also use lines to make your template a bit more polished.
- Include numbering and titling indications. Be sure to designate certain spaces in each shot box panel for the sequence title, scene/shot number, exterior/interior indication, camera direction, and other elements you want in your template. Having these designations ensures your storyboards have all of the necessary information each time and are consistent on every page of a single story.
You can take this single-page template and duplicate it as many times as you need to have a full series of panels to outline your visual story. When you go to use your template, take the PDF version of the Word or PowerPoint template or the JPEG version of Illustrator-made template and insert images and text. You could also make a new file out of either type of template and fill it in on that program as well. Or, if you prefer putting hand to paper, print out your template and sketch away.
As you use a storyboard template, remember to use it as a guide to translate your script into a compelling visual story. Compose frames with clear character desire and precise action in mind. Then, share this tool with other filmmakers on your project to create the most captivating scenes and sequences for your audience.


